What Is Last Modified?
How It Works?
Why do you need Last Modified in WordPress? If you have a blog and this question arises, then not all of your pages are indexed correctly. In this article, we’ll explain what Last Modified is, how it affects page indexing, and why it needs to be set up correctly.
Last Modified is a server response that informs a client about changes made on a certain web page. The client, also known as the search engine bot, sends a request to a server. If there were no changes, the server sends back a response with 304 Not Modified. It means that the bot won’t address this page again, and will move to the next one.
Bots usually don’t spend much time on websites. Thus, it’s better to make them focus on new or modified posts, instead of scrambling through the old entries. Besides, the faster the bot does his job, the lesser load is produced on a server.
If a bot finds a modified page, the server indicates it with the 200 OK header. Once checked, the page will be indexed again.
How Last Modified helps:
- pages load faster;
- less load on a server;
- fast page indexing;
- higher ranking positions in search results + displays the date of last changes.
The Same, But In Simple Language
When a search bot is in a process of indexing content, he is like a blind, deaf and dumb creature that searches for modified pages using the nose. But when Last Modified is defined, the creature gets his eyes back. He stops running in circles and goes to a certain direction.
Here’s how this process described in tech language: an author changed text and edited 10 web pages. When a bot comes to a website, he no longer needs to index the whole content (even if there are hundreds of pages!), as Last Modified directs a bot to the necessary content. However, keep in mind that you need sitemap.xml for correct indexing.
How To Set Up Last Modified In WordPress
With A Plugin
To improve your website performance, we recommend you our optimization plugin Clearfy. Developers have added useful features to the plugin. And you can also use it to add the Last Modified header automatically.
Let’s see how it works.
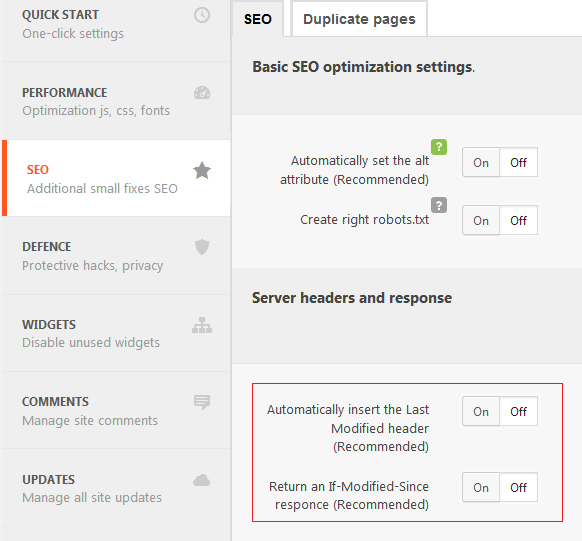
When you install and activate the plugin, go to Settings => Clearfy menu => SEO.
Go to the Server headers and responses block. Activate both options inside the red box by pressing ON. They are disabled by default.
Server Headers And Responses Setup
If for some reasons you don’t want to use the plugin, copy the following text to the header.php file:
header("Last-Modified: " . date('r',strtotime($post->post_modified)));
However, this code applies for posts and pages only. It’s useless for the main page, archives, recent comments, and taxonomy.
So use this one instead:
<?php
$LastModified_unix = 1294844676;
$Last Modified = gmdate(«D, d M Y H:i:s \G\M\T», $LastModified_unix);
$IfModifiedSince = false;
if (isset($_ENV[‘HTTP_IF_MODIFIED_SINCE’]))
  $IfModifiedSince = strtotime(substr($_ENV[‘HTTP_IF_MODIFIED_SINCE’], 5));
if (isset($_SERVER[‘HTTP_IF_MODIFIED_SINCE’]))
  $IfModifiedSince = strtotime(substr($_SERVER[‘HTTP_IF_MODIFIED_SINCE’], 5));
If ($IfModifiedSince && $IfModifiedSince >= &LastModified_unix) {
  header ($_SERVER[‘SERVER_PROTOCOL’] . ‘ 304 Not Modified’);
  exit;
}
header(‘Last-Modified: ‘ . $LastModified);
?>
If there are some problems with hosting, and you can’t set up Last Modified, add these two lines of code to .htaccess:
RewriteRule .* — [E=HTTP_IF_MODIFIED_SINCE:%{HTTP:If-Modified-Since}]
RewriteRule .* — [E=HTTP_IF_NONE_MATCH:%{HTTP:If-None-Match}]
Conclusion
For better page indexing and greater search results, many bloggers and website owners with the focus on high traffic use Last Modified in WordPress. We’ve provided you with two options: use the optimization plugin or change the code. Using plugin is easier, but has some downsides. If you have many websites you may forget to activate the plugin option in one of them. As for the code, well, be extra careful. Changing the code with poor coding skills can cause serious damage to the whole website.
